Immunofluorescence Refresher Webinar
Immunofluorescence Refresher Webinar
- The advantages of IF over traditional staining
- What to consider before starting an IF experiment
- How to choose your antibodies and fluorophores for success
- General IF protocol with technical tips
- How to visualise your slides and what microscope is best for you
- FAQs and troubleshooting
Video Transcription
Hi, everyone. Thank you so much for attending our webinar series. My name is Rebecca Northeast, and I have recently joined Proteintech as a technical specialist. I came from the University of Manchester, having just finished my postdoc in metabolism. Before that, I did my Ph.D. in neuroscience. Today, we're just going to do a short webinar looking at the technique immunofluorescence, just giving you a quick refresher, because sadly, so many of you would have probably been out of the lab for a while and we just wanted to go over a few things before we get back in and get going into all our science. The agenda for the talk today is a quick introduction to immunofluorescence, and also to Proteintech, before looking at some considerations before we start immunofluorescence, next a brief overview of the IF protocol. How we choose our best antibodies and fluorophores for experiments, looking at how we visualize our samples using widefield or confocal microscopy. Then also, finally looking at some common troubleshooting issues.
Introduction to Proteintech
Most of you will probably already know Proteintech, but if you don't, here's our company introduction, and I promise it won't take too long. At Proteintech, we have been the original manufacturer of antibodies, ELISA kits, and proteins since 2002. We recently became ISO accredited, and this means that we can now manufacture GMP grade cytokines and growth factors to use in cell and gene therapies. We have five global inventory sites. This means all of our products are in stock and available for next day delivery.

The main difference between Proteintech and other antibody suppliers is that we manufacture every product ourselves and you can only buy our products with our label on it. By cutting out the middleman and not allowing anyone else to sell our products under their label we offer you complete transparency, and this means more lot-to-lot consistency because we can guarantee supply in addition to our huge library of original validation data, direct from the lab with complete control over quality of our antibodies. Making sure it works in your hands.
Proteintech has polyclonal and monoclonal antibodies against 13,000 targets. Within that, we have antibodies against two-and-a-half thousand targets, which have had their specificity verified by KD/KO validation. This is the broadest coverage of KD/KO validation antibodies in the antibody industry. This year, we have also launched CoraLite fluorescent-dye antibodies for use in the direct immunofluorescence, and also protein ladders for the Western world. As a company, we measure our success by your scientific success. Specifically helping you publish impactful research faster. This graph shows that over our company history, our products are featuring in more and more publications each year. As of today, we have over 65,000 publication citations. I hope that this webinar, and our series of refresher talks this week, can help you to become a published researcher. Quickly, just going to talk about the different anagrams that we see around immunohistochemistry and immunofluorescence.
1. Introduction to IHC, ICC
IHC refers to immunohistochemistry, which is simply referring to the binding of an antibody to an antigen within a tissue. Here, you can see a rat brain slice, stained with a MAP2 antibody, which is a common neuronal marker, in red. In green, you've got GFAP, which is an astrocyte marker. Another anagram that you might see is ICC. ICC is immunocytochemistry, which simply refers to the binding of an antibody to an antigen within cells, so antigen detection within cells. Here, we have HepG2 cells stained in green by the perillipin antibody and in red by the common cytoskeletal protein actin. The basic premise behind immunofluorescence is where an antibody binds to the desired antigen in your tissue or cells. After this, we can then add a secondary antibody which will bind to the primary, and is specific to the host, that the primary antibody was raised in. This secondary antibody will then bind to that primary antibody, and the secondary antibody is labeled with a fluorophore. This fluorophore will emit light at a specific wavelength.
Then in order to multiplex our samples, IF is special because you can then have multiple different fluorophore's within the same slide. In order to do this, you need to make sure that your primary antibodies are raised to different hosts. So, for example, you might have one antibody raised to mouse and one antibody raised to rabbit, and then your secondaries would be anti-mouse and anti-rabbit with different conjugated fluorophores, allowing us to image the separate wavelengths within the same sample before overlaying our images and getting these beautiful different colored images that we see today for our IF stains.
2. Considerations before you start
Before we start an immunofluorescence experiment, we need to consider how we prepare our samples in order to gain optimal results. Cells are seeded onto glass coverslips before fixation, which at the time should have a confluency of around 50% in order to yield optimal staining. If this confluency is too high, then you might get deformed cell architecture or high background. If they're too low, then you might get incorrect cell patterning. Some weakly adherence cells require the glass slide surfaces to be coated, for example, with gelatin, in order for the cells to stick.
Tissue should be cut at five to ten micrometers thickness. If your tissue is too thick, then you will get stronger signals, but this could also result in poor resolution, especially with the widefield microscope. You will also get high background because you will therefore have more antigen present in the sample, providing you with more fluorescence from the fluorophore. If your tissue is too thin, then this will become easy to damage and also it could be difficult to embed resulting in, again, poor staining.
Another thing we need to consider before we start is how we fix our samples. Tissues and cells need to be fixed before staining, as this protects cells and structures falling apart. Tissue often requires a longer fixation process, either through perfusion or immersion, than cells do. Formaldehyde, such as paraformaldehyde, work as a fixative as they cross-link proteins. These covalent cross-links of proteins, essentially forming an insoluble meshwork.
Formaldehyde is good because it conserves cellular morphology, but however, it can cause some cross-linking of epitopes, which can mask certain epitopes and can also cause autofluorescence, which I will go over later on. Organic solvents, such as ethanol and acetone work as fixatives by dehydrating the cells and causing proteins to precipitate and denature in situ. Ethanol conserves cellular architecture and it's often best used for frozen samples and frozen cells. This can damage certain epitopes, however, and can cause a loss of lipid components. Acetone is an organic solvent, and is a strong dehydrating agent. It's often used to preserve tissues. This is slightly more gentle on epitopes than formaldehyde, but also results in a loss of lipid components similar to ethanol.
3. IF protocol
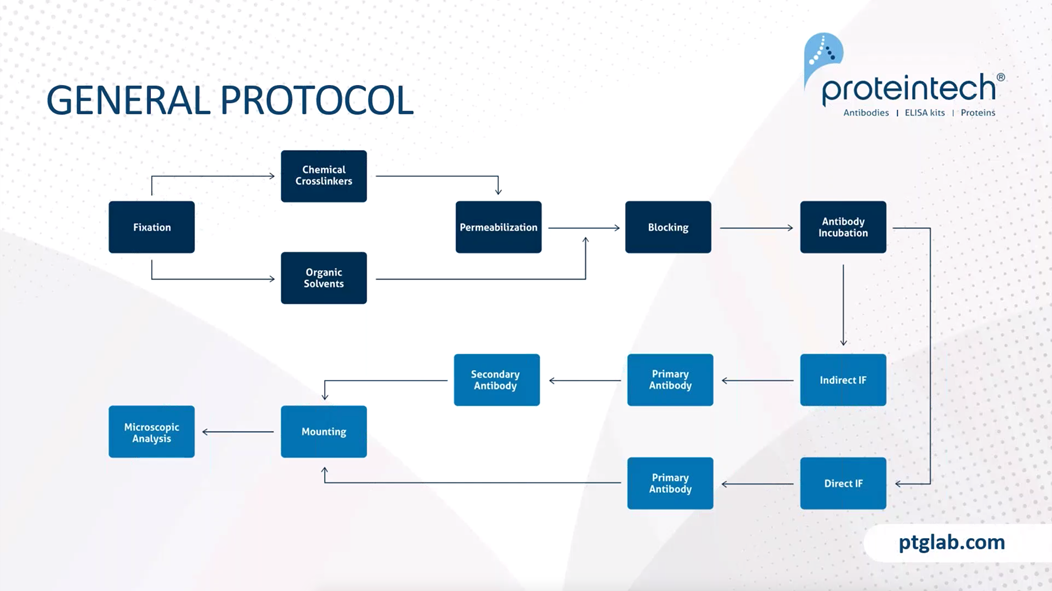
The general protocol for immunofluorescence is relatively straightforward. It starts, as mentioned, by the fixation step, which this can either be through chemical cross-linkers, such as PFA, or organic solvents, such as ethanol. Chemical cross-linkers, so PFA, would then require a permeabilization step in order for antibodies to reach into cellular targets. Organic solvents, however, break down the plasma cell wall, and this is not required.
This permeabilization step is not required. It then needs to have a blocking step, as this allows us to prevent any nonspecific binding of an antibody within our tissue or cells. Following blocking, we then move on to antibody incubation. This then differs as to whether or not we have an indirect immunofluorescence protocol or a direct immunofluorescence protocol. With indirect immunofluorescence, you first incubate with your primary antibody followed by your secondary antibody. You have to ensure that you have sufficient washing in between your primary antibody and your secondary antibody incubation's prior to mounting, in order to ensure that you have removed any unbound antibody that could cause high-background or nonspecific staining within your samples.
When you have direct immunofluorescence, this is where the primary antibody is directly conjugated with a fluorophore and therefore you only have one step prior to washing and then mounting. When mounting our samples we want to ensure that we use a good anti-media and seal it with either nail varnish or some other varnish before then moving onto our microscopic analysis in order to visualize our slides.
Cellular permeabilization is a really important step. As this allows us to access intracellular targets, following cross-link fixation with something such as PFA. We can use strong non-ionic detergents for the staining of anterior membranes, such as nuclear membranes. For this, you would use something such as Triton-X. If we want a more mild detergent, we can use something such as Digitonin if we're just looking to stain cytoplasmic targets. SDS is another interesting tool that can be used, as this partially denatures cross-links and can reveal some inaccessible epitopes following PFA fixation. As I mentioned, if we're using organic solvents as a fixative, we do not need a permeabilization step as organic solvent already breaks down the cell wall.
Why do we need to block our samples? We need to have a blocking step in our samples as this prevents any nonspecific binding of an antibody in the tissue or to any endogenous FC receptors. Serum is a common blocking agent, as this contains antibodies that will be able to bind nonspecific sites already. Therefore, this is an important step to do prior to our primary antibody incubation.
Protein blocking, we often use normal serum, and this is typically against the species of a secondary antibody. It is important that the blocking serum is not the same species as the primary antibody, otherwise, you will lose any specificity of your secondary antibody. If that makes sense, say we have our antibody raised in rabbit. We want to make sure our primary antibody raised in rabbit. We want to make sure that we use a serum that is different to that. Otherwise, if it was also raised in rabbit, when we used our anti-rabbit secondary, that would therefore lose all non-specific binding. BSA is also commonly used as a protein blocker in conjunction with Triton-X.
4. Choosing the best antibodies and fluorophores
It's really important that we carefully choose our antibodies when performing immunofluorescence. In general, polyclonal antibodies are most traditionally used for immunofluorescence. Sorry if people know this already, but a polyclonal antibody is where the antibodies have been raised against the whole protein or peptide. Therefore, they have, there are many antibodies to many different epitopes towards this protein and therefore, they have higher affinity.
A monoclonal antibody is one that has been raised against just one epitope. Therefore, these antibodies have higher specificity and are less likely to cross-react within our sample. Monoclonal antibodies are best if your antigen is highly abundant and polyclonal antibodies are best for the majority of targets, but especially if your target is less abundant. Again, when choosing our antibody, it's important that you perform enough research to ensure that your antibody is suitable for what you want. You can ensure that the antibody is cited for the application, possibly again, with the tissue that you want as well and that kind of fixative that you're planning on using. The Proteintech website shows you the publications that have been used in our antibodies and also, will give you product-specific protocols for the application that you require. In trying out a new antibody, we highly recommend performing a titration experiment where you vary the concentration and incubation of your antibody for the best performance, but you want to see the best signal to noise ratio.
In choosing your secondary antibody, you want to make sure that it is against the host species of your primary. If you're using a primary monoclonal antibody, then you have to ensure that your secondary has an IgG heavy and light chain in order that it will recognize the isotope of you're monoclonal.
As mentioned before, we can have direct or indirect immunofluorescence. With direct immunofluorescence, this is where your antibody is directly conjugated to a fluorophore and therefore removes the need to use a secondary conjugated antibody. With indirect, you can see that you have your primary unlabeled antibody, which has been bound with multiple secondary antibodies, which have fluorophore tagged. Because the secondary antibody can bind to multiple epitopes of your primary antibody, this means that you get multiple secondaries and therefore, multiple fluorophores within just one antibody. This, therefore, amplifies your signal.
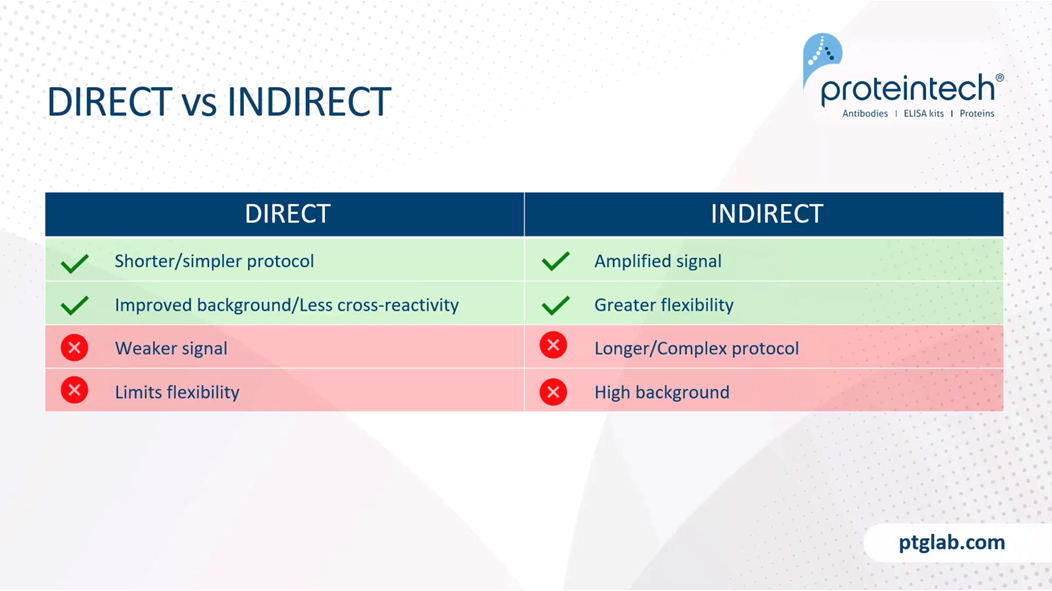
Whether or not you choose direct or indirect is completely up to what you're looking for in your experiment. Direct immunofluorescence is good because it reduces the time of your protocol. Also, it's really good if you have a highly abundant antigen, as this will improve the background and has less cross-reactivity. As mentioned, you will get weaker signal and also limits flexibility, because you can only use this one fluorophore for that target. Indirect is good because it amplifies less abundant antigens, and also has greater flexibility, as you can use multiple different secondaries and different colored fluorophores attached, to use for different experiments. However, this has a slightly longer context or more complex protocol and can result in higher background.
At Proteintech, we have recently launched our new range of CoraLite fluorescent dye, conjugated antibodies. This is where our popular monoclonal and polyclonal antibodies are now available with the CoraLite fluorescent dye. These can be perfect tools for] immunofluorescence studies requiring multiplex co-labeling without the need for secondary antibodies.
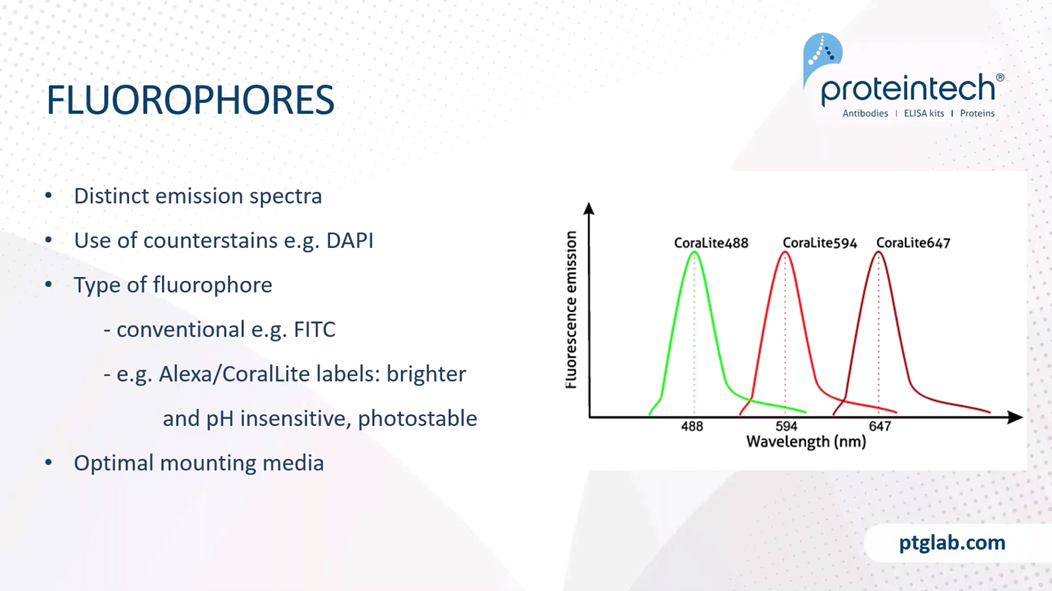
We have to ensure that we're using fluorophores with distinct emission spectra if we're using multiplex stains. Additionally, the use of counterstains, such as DAPI, are excellent, as it helps us to localize our signal. DAPI is a nuclear marker, and can help us see whether the staining is, for example, cytoplasmic, or within the nucleus.
The type of fluorophore we use is also important. Conventional fluorophores, such as FITC or Texas Red are perfect for the majority of applications. However, the new types of fluorophores, such as the Alexa or CoraLite labels, are brighter and pH insensitive and are often more photostable, and it will be good for samples that require high-level confocal imaging. Mounting media is also really important as this helps to optimize the refractive index for imaging and will slow down any photobleaching.
Photobleaching is something to look out for, especially if using original fluorophore secondaries such as Texas Red. Photobleaching can occur due to prolonged exposure to excitation. This, therefore, bleaches the fluorophore. One way to get around this is just to be careful when using our excitation wavelength, and also to use anti-fade mounting media. Finally, when preparing your samples, make sure you do so in the dark and store these in the dark as well.
Artefacts can occur without staining. Due to things such as over-fixation or freeze-thaw effects. You can also get high background, or artefacts due to over incubation of primary antibodies, or insufficient washing. Finally, when applying mounting media, ensure there are no bubbles present and that there is enough media to cover the whole sample.
In order to ensure that our results are valid, it is highly important that we run controls alongside our experiments. These controls should be performed at the same time as our normal experiments to ensure that we're getting valid results. Our antigen controls need to contain a positive control. So this is where we would use tissue that is known to express the target antigen. This confirms that our protocol is working and perhaps validates any negative results that we see, rather than just thinking with the antibody has not worked.
Our negative control needs to contain tissue known not to express the target as this reveals any false positives or non-specific staining. An example of this would be if you're looking at a certain brain area that you know contains your target creatine, and then you would also use a section of tissue that you know not to contain your target. Here is another way of doing this. So we can see that this HADHA antibody has been stained with the, is a cytoplasmic marker staining these cells. When we knock down HADHA with SIRNA, we can no longer see any specific staining. So this confirms how our antibody is specific for this target. Should also use an indigenous tissue control where you go through all the steps, but don't apply any primary or secondary antibodies, and this will reveal any potential autofluorescence caused through cross-linking.
Reagent controls that we need to use are ones that we have no premium antibody and this ensures that all signal detected is specific for the target. We also need to test all fluorophores in isolation to check that there's no bleed-through from the separate emission wavelengths. We also need an isotope control that we incubate with non-immune immunoglobulin of the same isotope and same primary antibody. This also ensures that our observed signal is specific.
5. Widefield vs confocal microscopy
Now we're going to talk about how we image our samples. So, as mentioned before, a fluorophore is what is attached to either our primary or secondary antibody. The way that fluorophores work is that we shine a specific wavelength of light and then this causes the fluorophore to emit a photon at a longer wavelength at a lower energy. This emitted light is called our emission spectrum. The microscopes that we use to do this need a powerful light source with all visible white light waves. This light then passes through an excitation filter to be reflected by a dichroic mirror. Where it passes through the objective and hits the specimen with the fluorophores. The fluorophores then emit the separate emission wavelength, which passes back through the objective, through the dichroic mirror, and then through the ocular and into the detection system. Where we can either visualize this directly or on a screen.
There are two common types of microscopes that we use for immunofluorescence. Widefield is the most common, and this is where the entire focal volume is illuminated. However, you can get some blur from out of focus planes. Confocal microscope is different because this has a pinhole aperture, and it allows us to create a focused beam of light, and we get multiple images. Therefore, having resolution along the Z-Axis.
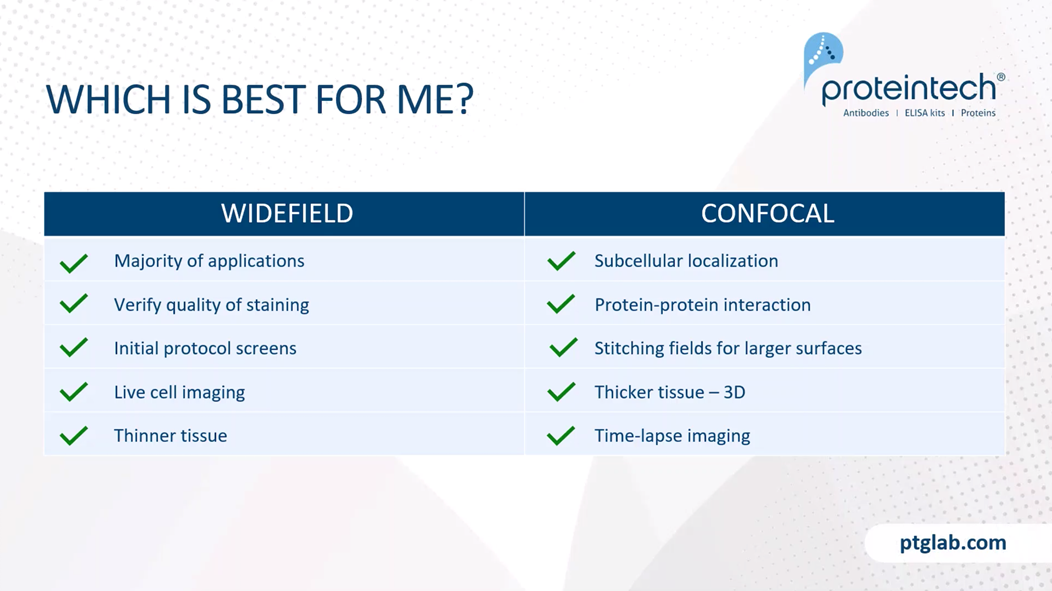
Which is best for your experiments? So in general, widefield is perfect for the majority of applications. Providing that your signal to noise ratio is sufficient. Widefield's are often used to verify the quality of staining of your initial protocol screens before moving on to the confocal microscope. Widefields are also cheaper to use and are generally more widely available. Due to the fast acquisition time, widefield can be used for live cell imaging. It's also good for thinner tissue, where Z stack resolution is not required. Confocal is excellent if we're looking at subcellular localization or protein/protein interactions with our targets. You can also get high-resolution large images by stitching together fields. As mentioned, confocal is perfect for thicker tissue, as it enables us to build up a 3D picture of the, using our Z stacks. You can also get time-lapse imaging through special software with confocal microscopy.
Here's just some differences. The same kind of sample, but with different microscopes. On the left here, we have our widefield microscope, where you can see that you get some blur from out of focus focal planes and some bleed-through with our emission spectrum. On the right, you can see the confocal. The confocal allows us to narrow our emission spectra and be more specific with what light we allow through to our detector. Also, the imaging along the Z-axis allows it to be, have high resolution. Therefore, you can see the protein/protein interactions here with the Paxillin and the Alpha Tubulin.
6. Troubleshooting
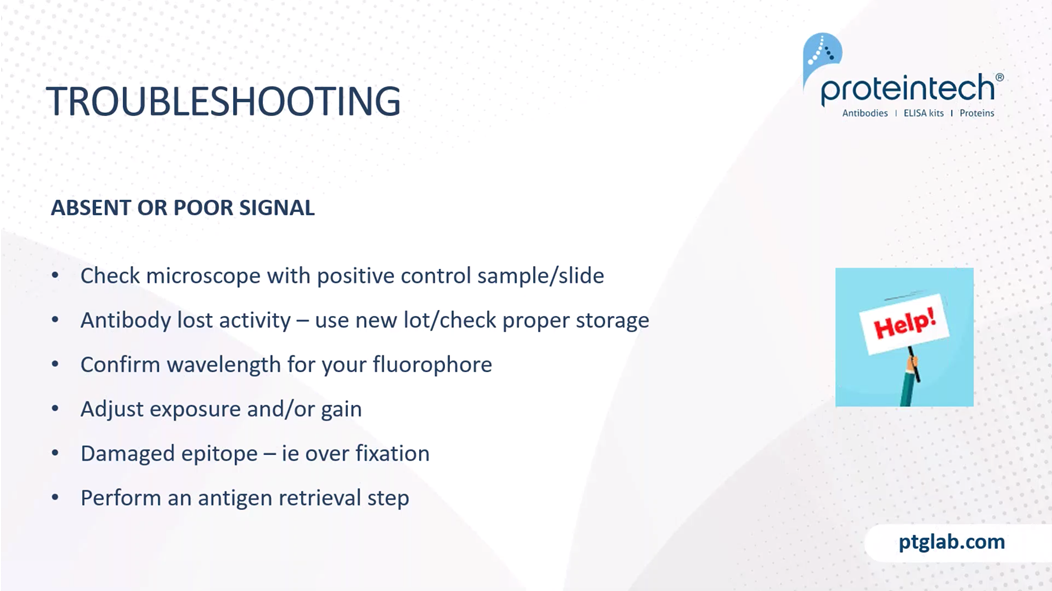
Finally, we'll just quickly go through some common troubleshooting. If you have absent or poor signal, it's really important to check the simple things first. Say, for example, I would check that your microscope is working. They have positive controls that may be from an experiment that you used earlier, so you know that someone hasn't accidentally changed your excitation emission filters or done something that means that you can't actually see your own samples.
Another reason for absent or poor signal might be that your antibody has lost activity. If you think this is the case, then use a new lot and ensure that you are storing your antibody according to the manufacturer's instructions. For example, some antibodies have to be stored in aliquots because other antibodies, such as the Proteintech antibodies, come with glycerol and therefore do not need to be aliquoted, and aliquoting can in fact cause them to lose their activity.
One other important thing is to confirm the wavelength of your fluorophore. To make sure that you are having the correct excitation-emission with your microscope. Something that might be different as well, especially if you're looking at a target which is either really high or low in abundance, is to adjust your exposure or gain. If you have a really low abundant protein, then you will need to increase your exposure and gain in order to be able to visualize this. The epitope that you're targeting might also have been damaged potentially through the fixation process, or you might need to perform an antigen retrieval step in order to then visualize it.
Another common problem with immunofluorescence is nonspecific staining and high background. This could be due to poor permeabilization for nuclear targets. Or potentially high antibody concentrations. Therefore, you need to perform trial titrations and optimize your antibody incubation time. Though, on the right, you can see here, some cells that should have been stained for the clathrin antibody, which is a vesicle protein. I don't know how well you can see this, but the vesicles are on the right. A too high antibody concentration is causing this bleed through, therefore you can't see individual vesicles. When we reduce our antibody dilution to 1 in 500, you can clearly see these vesicles and there's much less background staining, therefore, allowing better resolution of our image.
High background can also occur due to insufficient washing because you haven't removed all the unbound antibody in the sample. Also, when performing immunofluorescence, it's really important not to let your tissue dry out between washes and incubation's, the dehydration caused by this can cause high background.
Autofluorescence within the tissue is something that can occur and is often due to PFA cross-linking the amino acid's tyrosine and tryptophan. These cause autofluorescence due to the formation of the fluorescent formaldehyde aducts. You can also get endogenous pigments, such as lipofuscin which is a protein that occurs during aging, and collagen, which is a structural protein in the liver and muscle. These proteins, when highly abundant, are endogenous pigments and can strongly autofluorescence. For example, collagen can autofluorescence in the blue region, unless they're in the green region. It is important to choose fluorophores that are not targeting these emissions spectra in order to minimize any autofluorescence that you see. Heme molecules has a similar effect as well. If possible, profuse your samples with PBS before staining and fixing.
So that's it for me. Thank you so much for attending. If you have any further questions feel free to email myself, the technical specialist for Europe, at rebecca@ptglab.com. Or Will, who is our scientific officer in the US. We also have further resources on our website. We have detailed tips and FAQs for all our applications, as well as our product-specific protocols.